Bun visual regression testing
UI Verify runs visual regression tests on bun test. Your tests drive the Chrome you already have installed through Bun.WebView, each one archives the page it ended on, and UI Verify screenshots the archive in one pinned browser and diffs it against the baseline. Your coding agent sees what its change did to the UI before it opens a pull request, and every pull request is checked again. No Playwright, no Node test runner, and no screenshots in your repo.
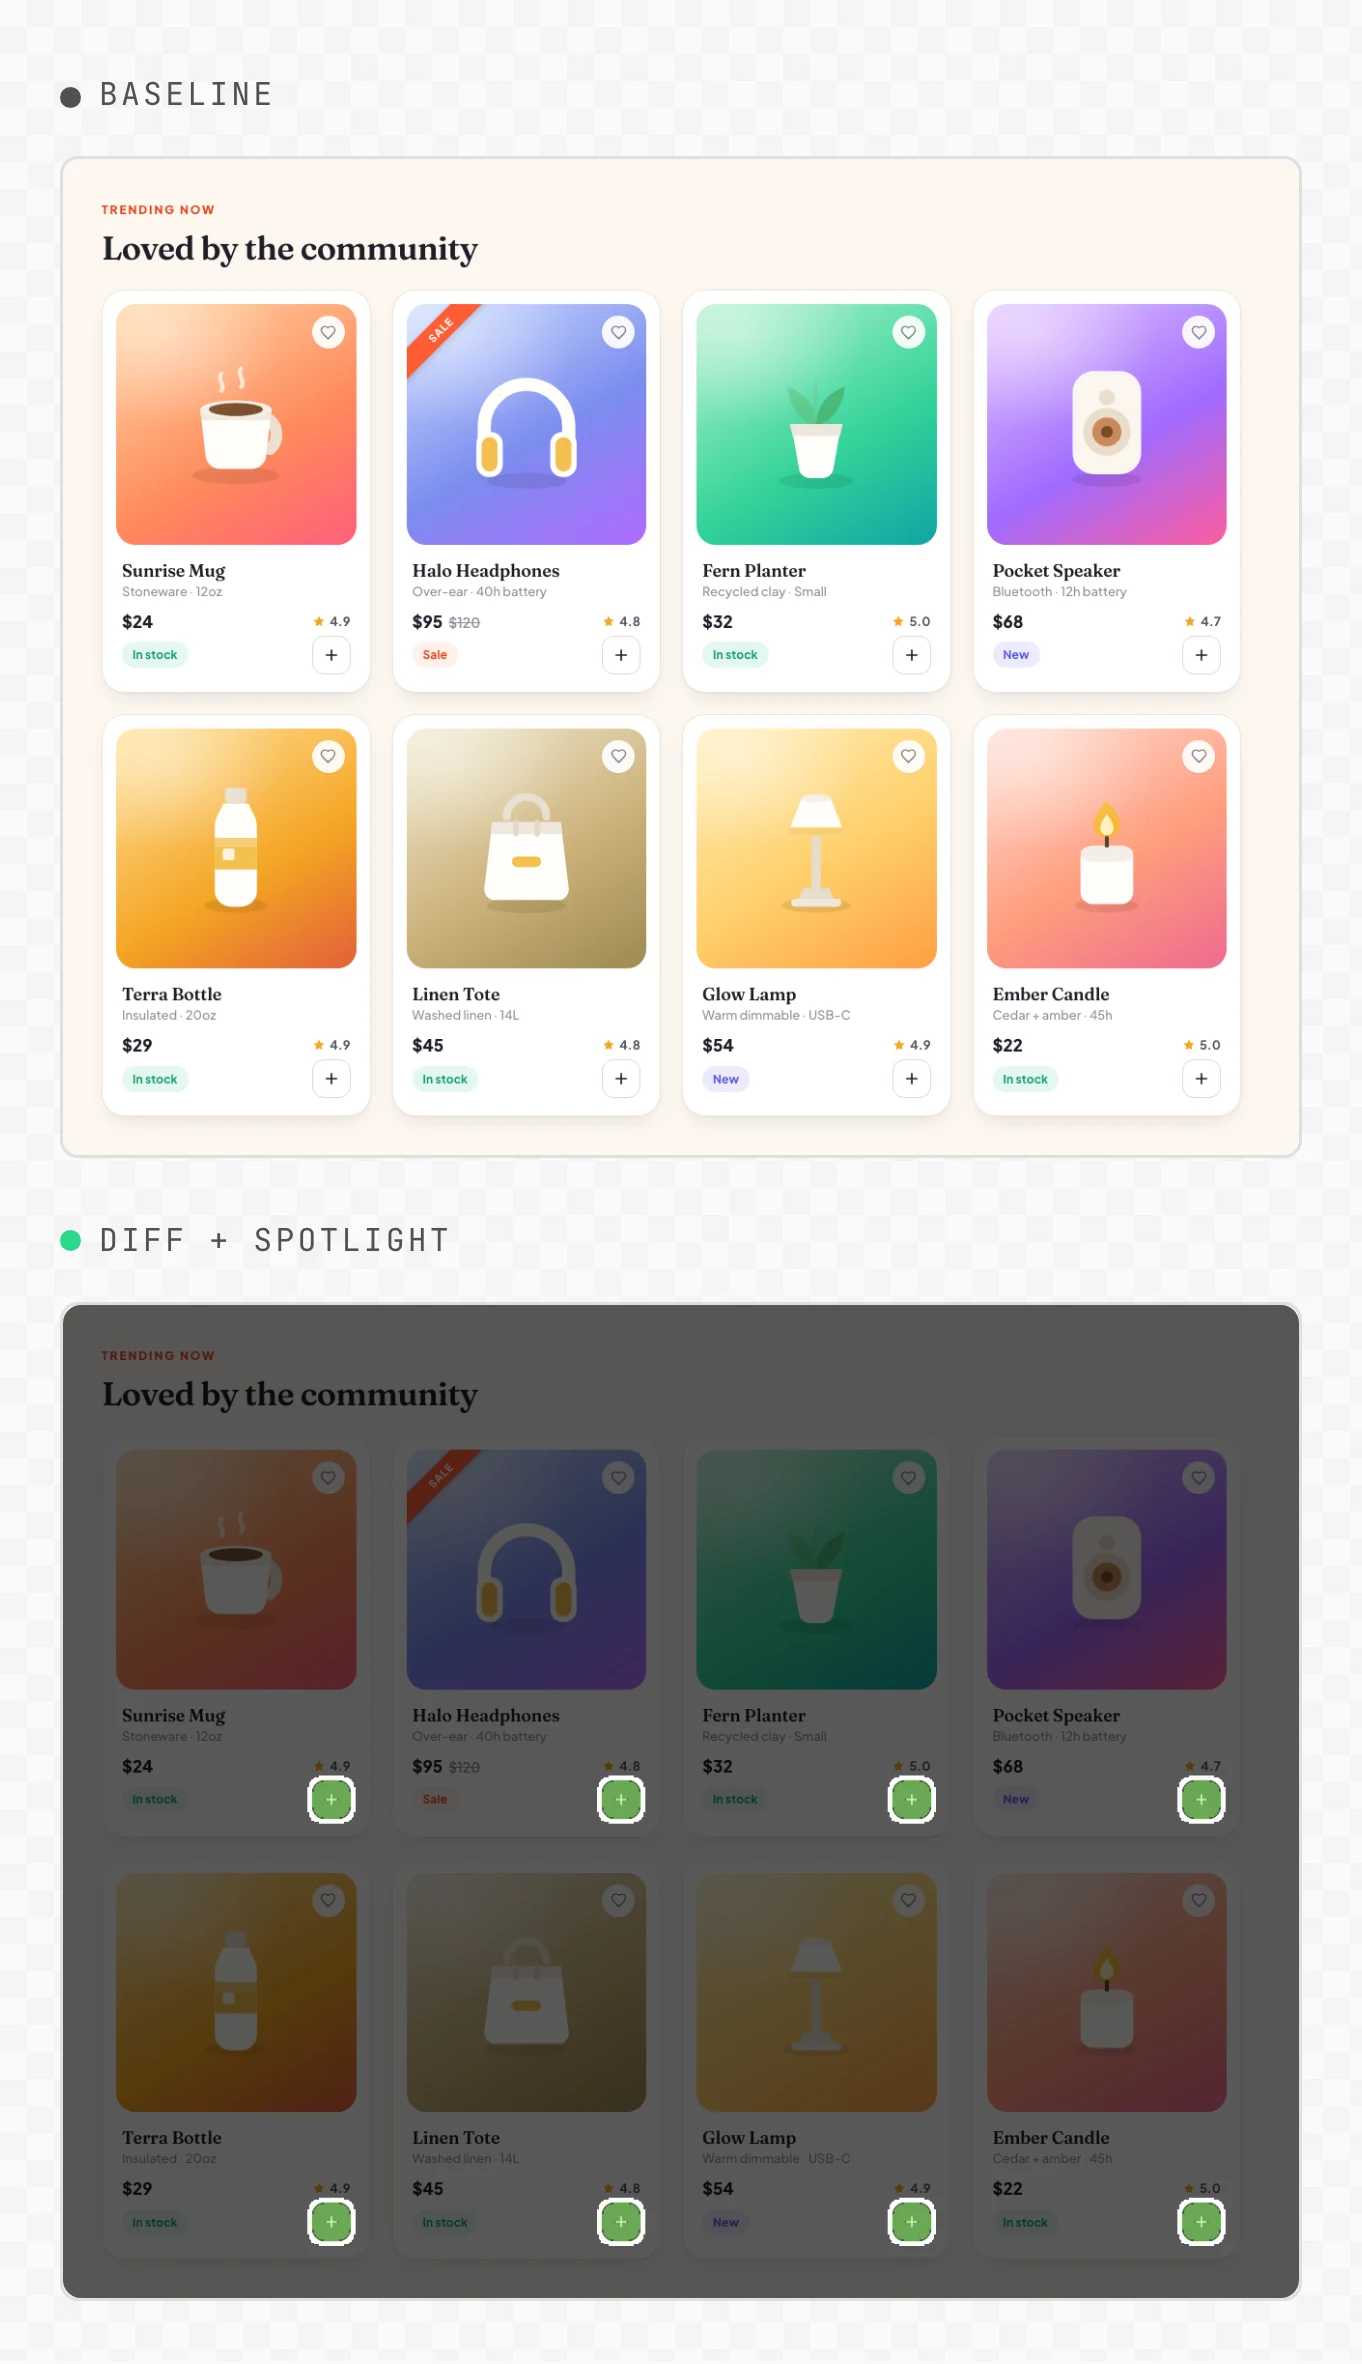
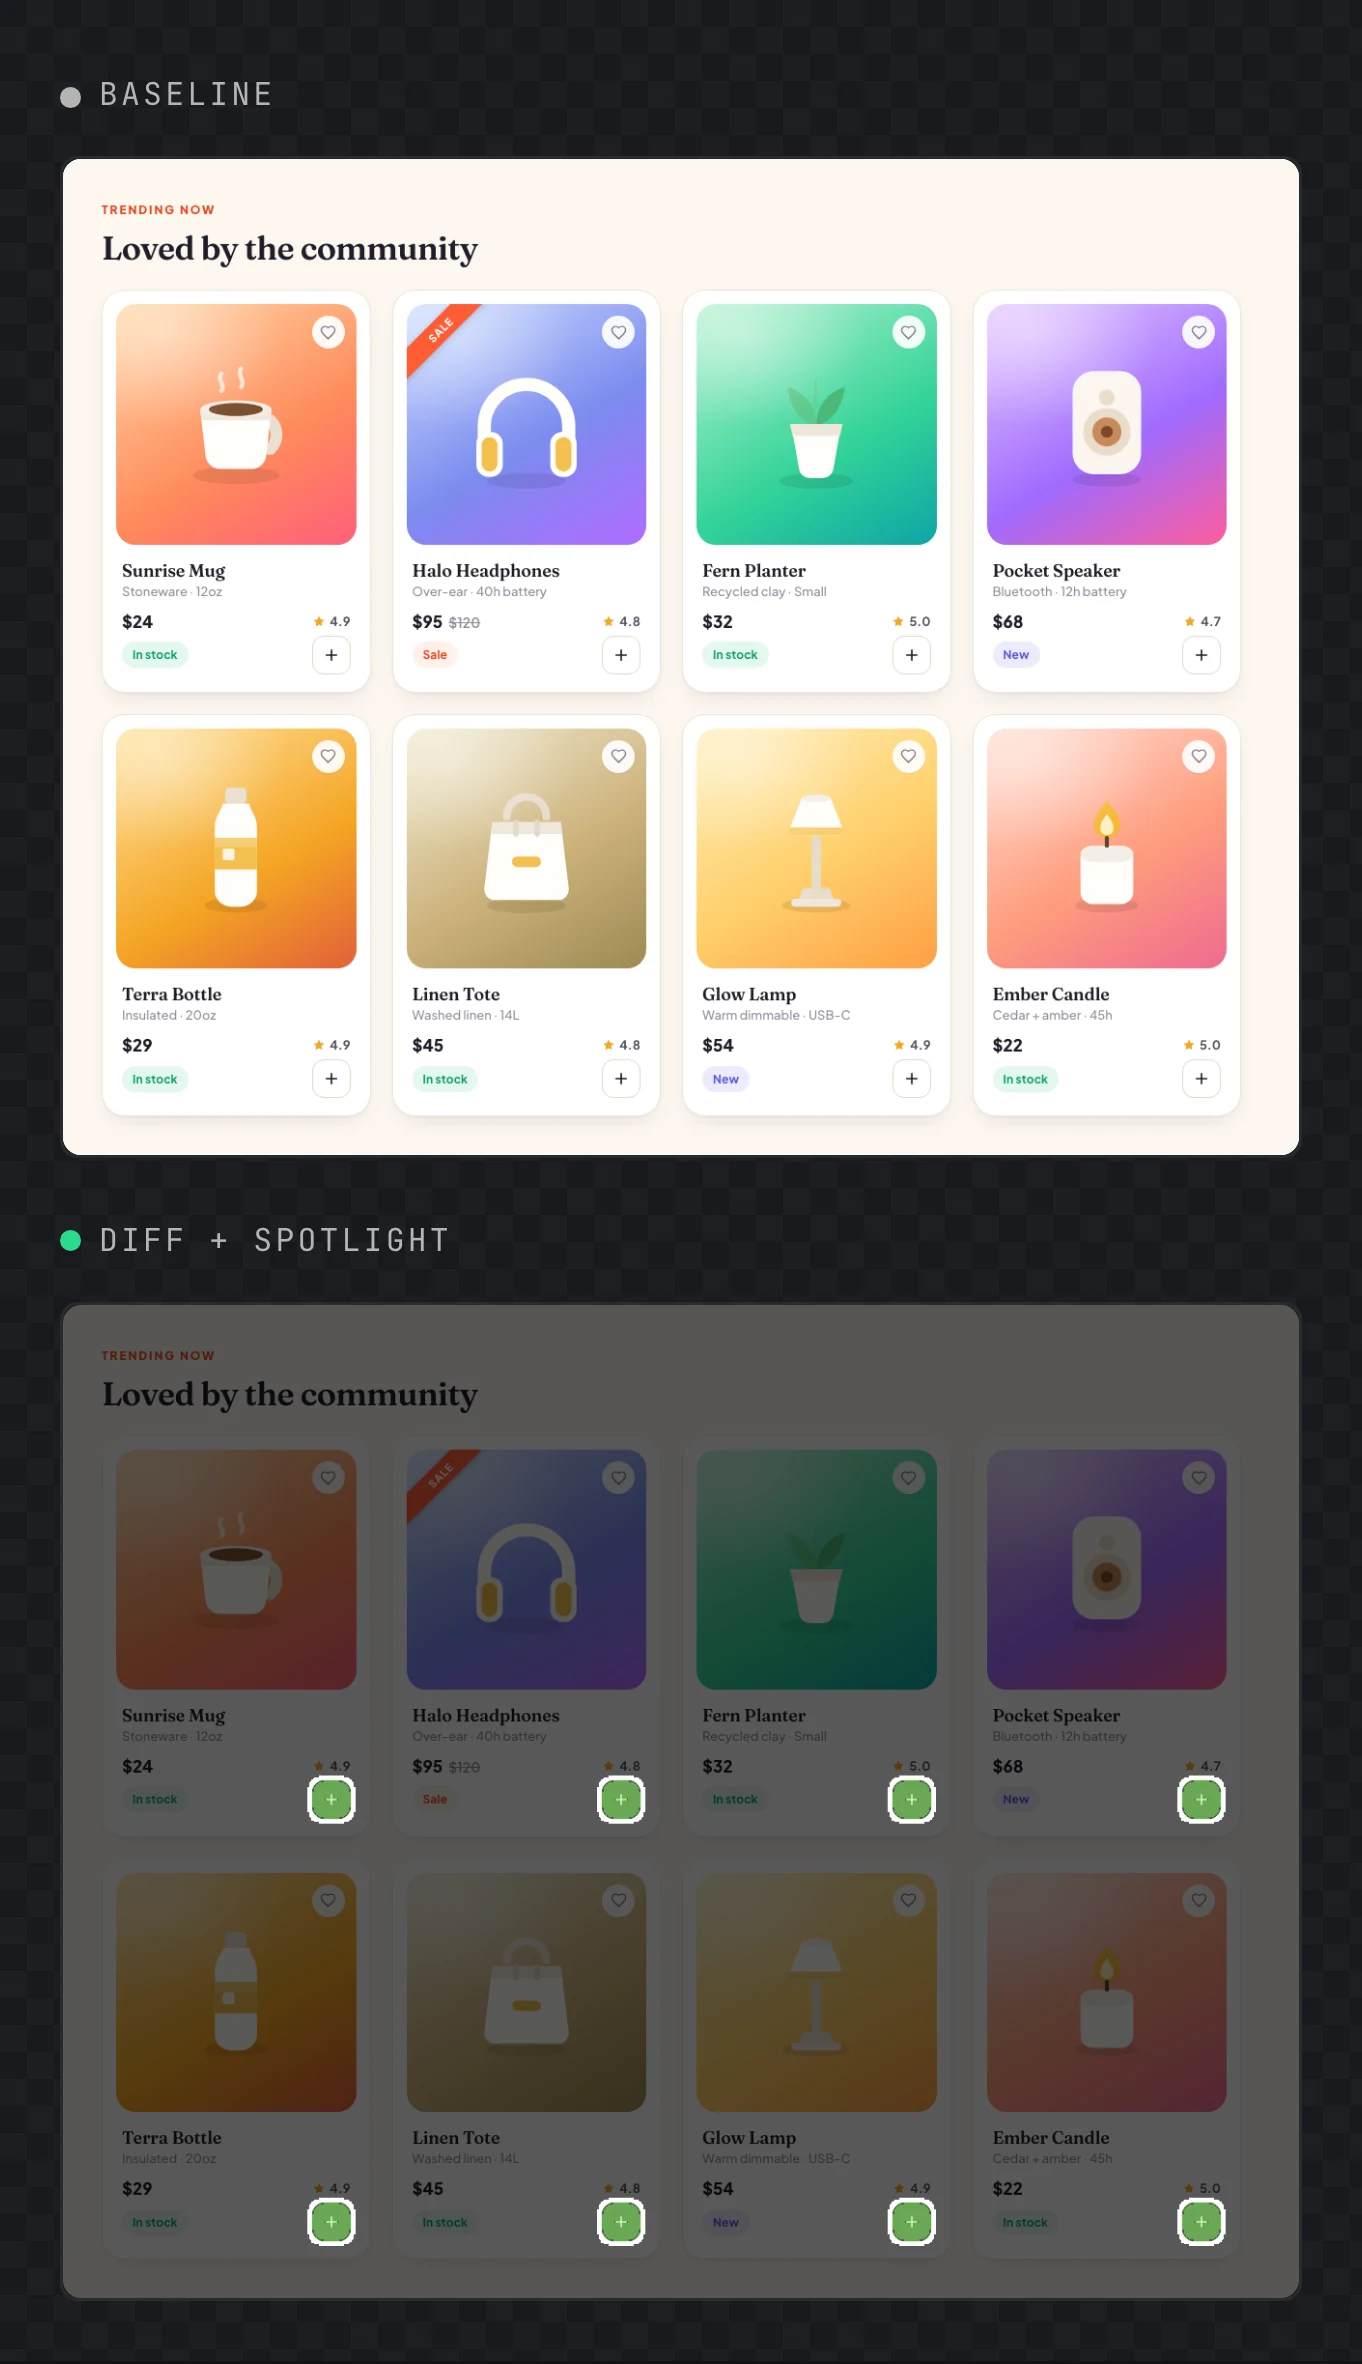
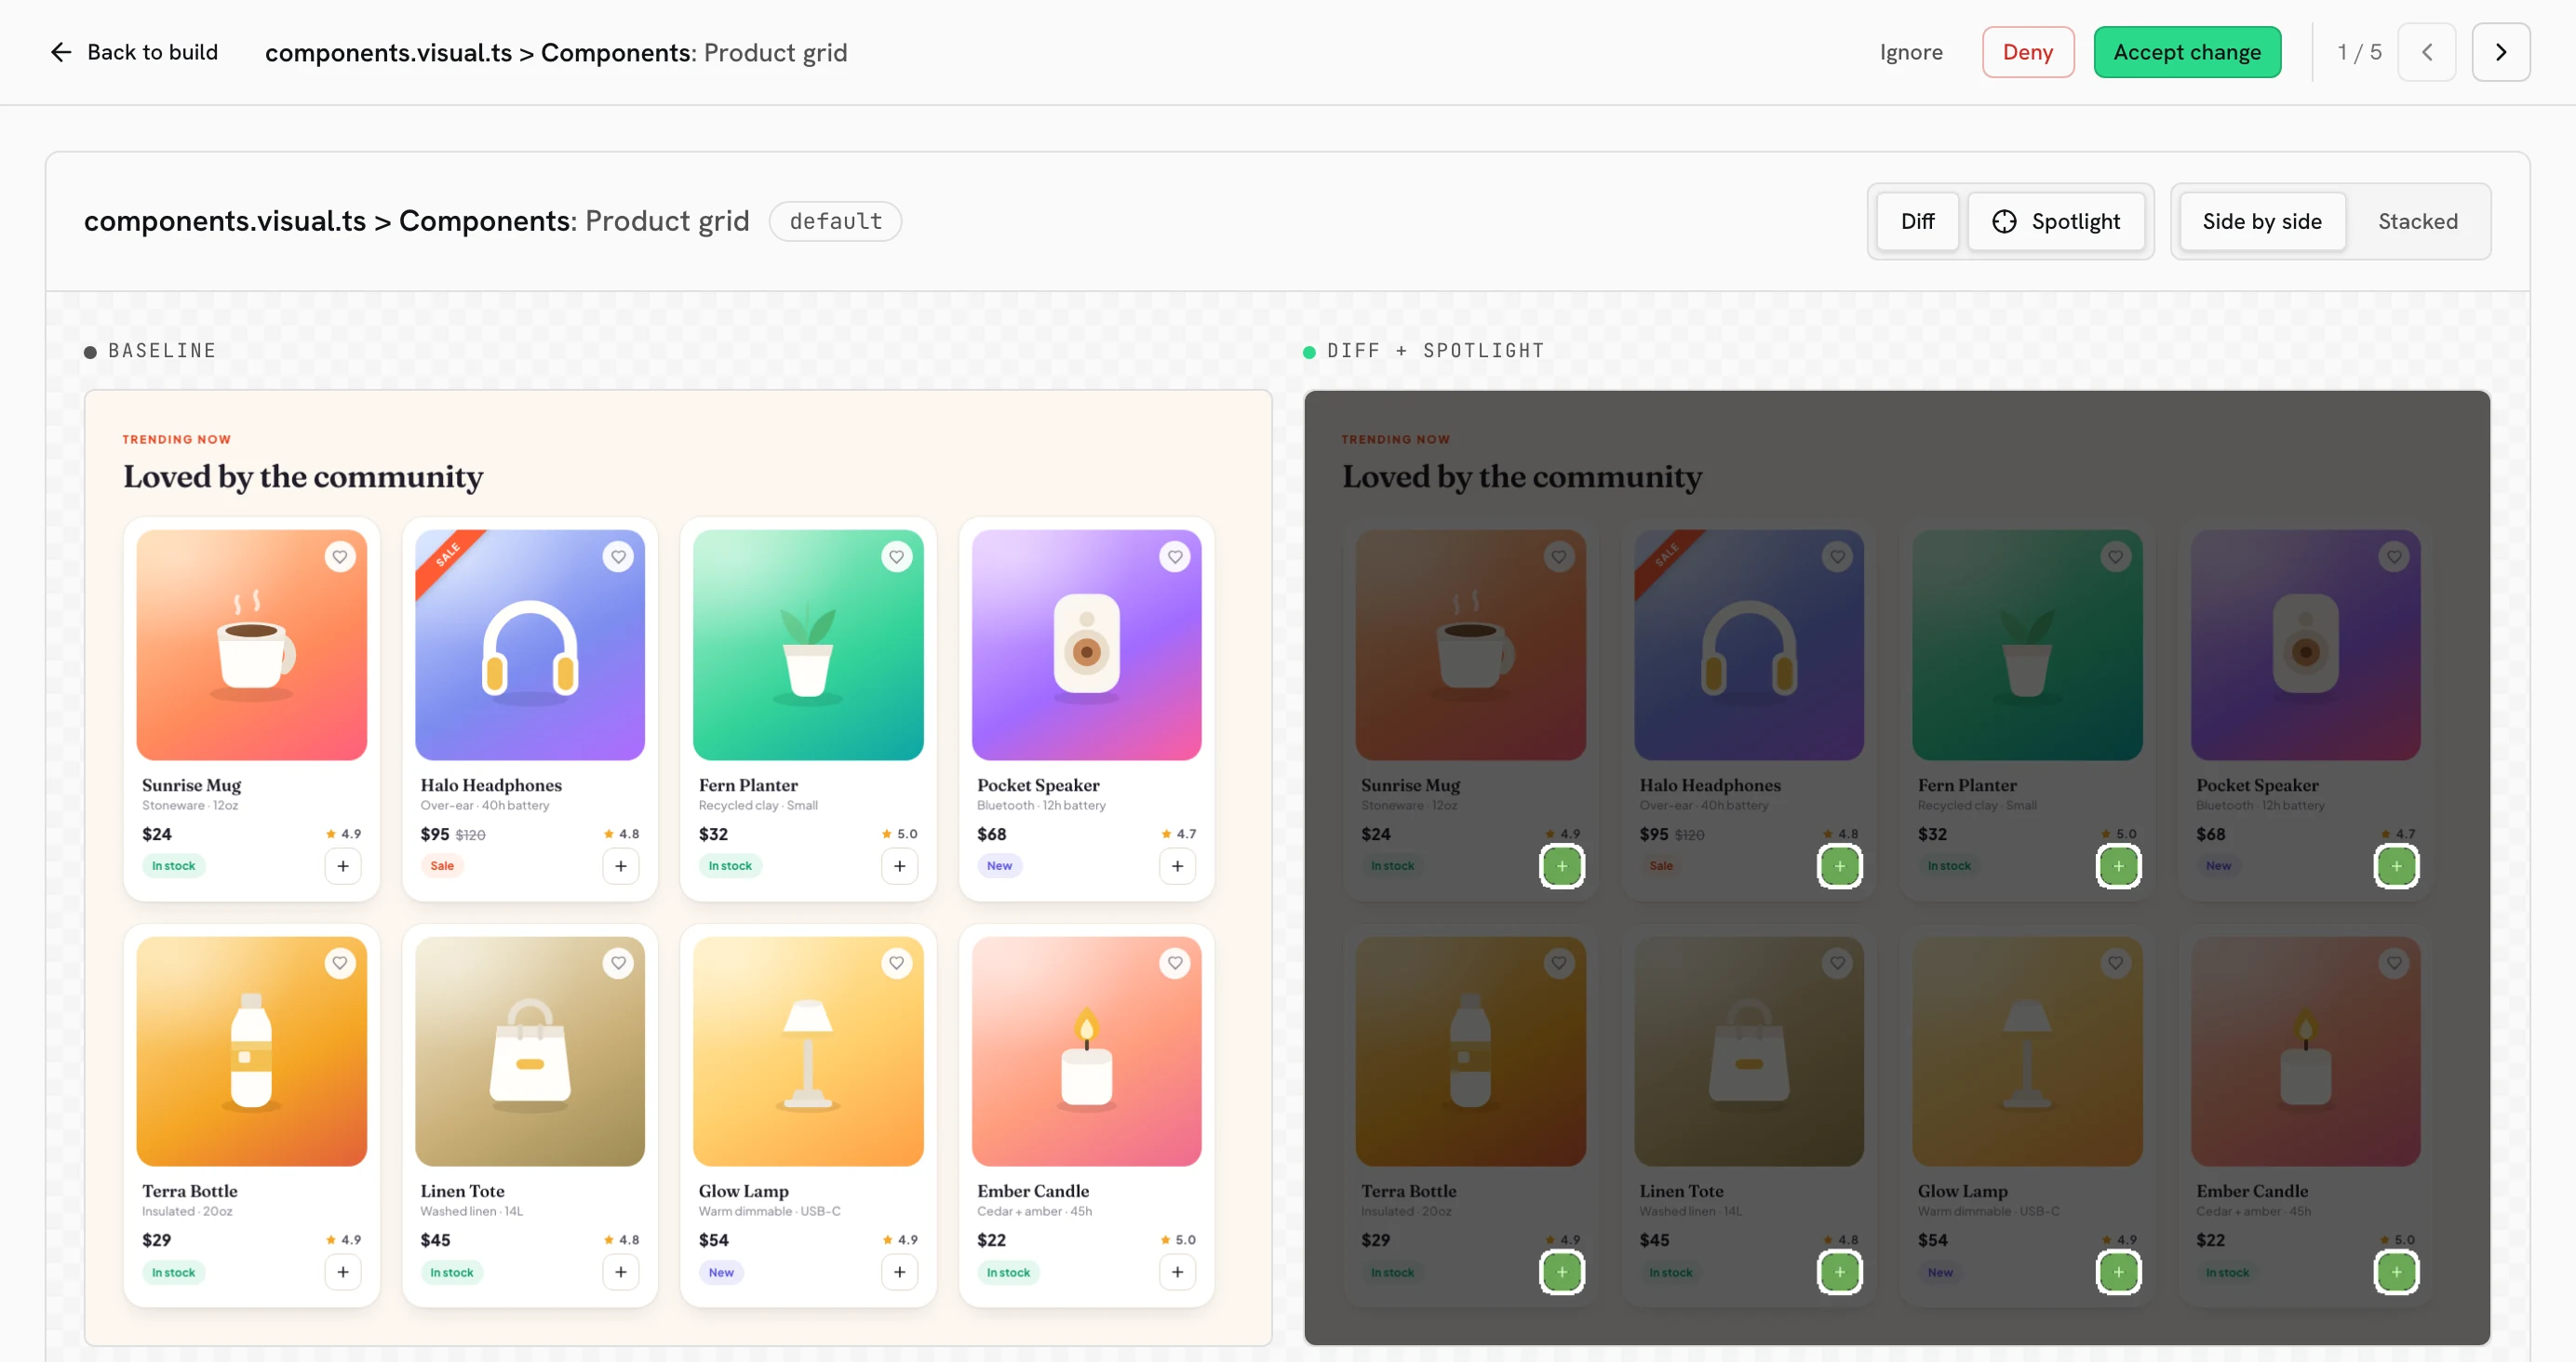
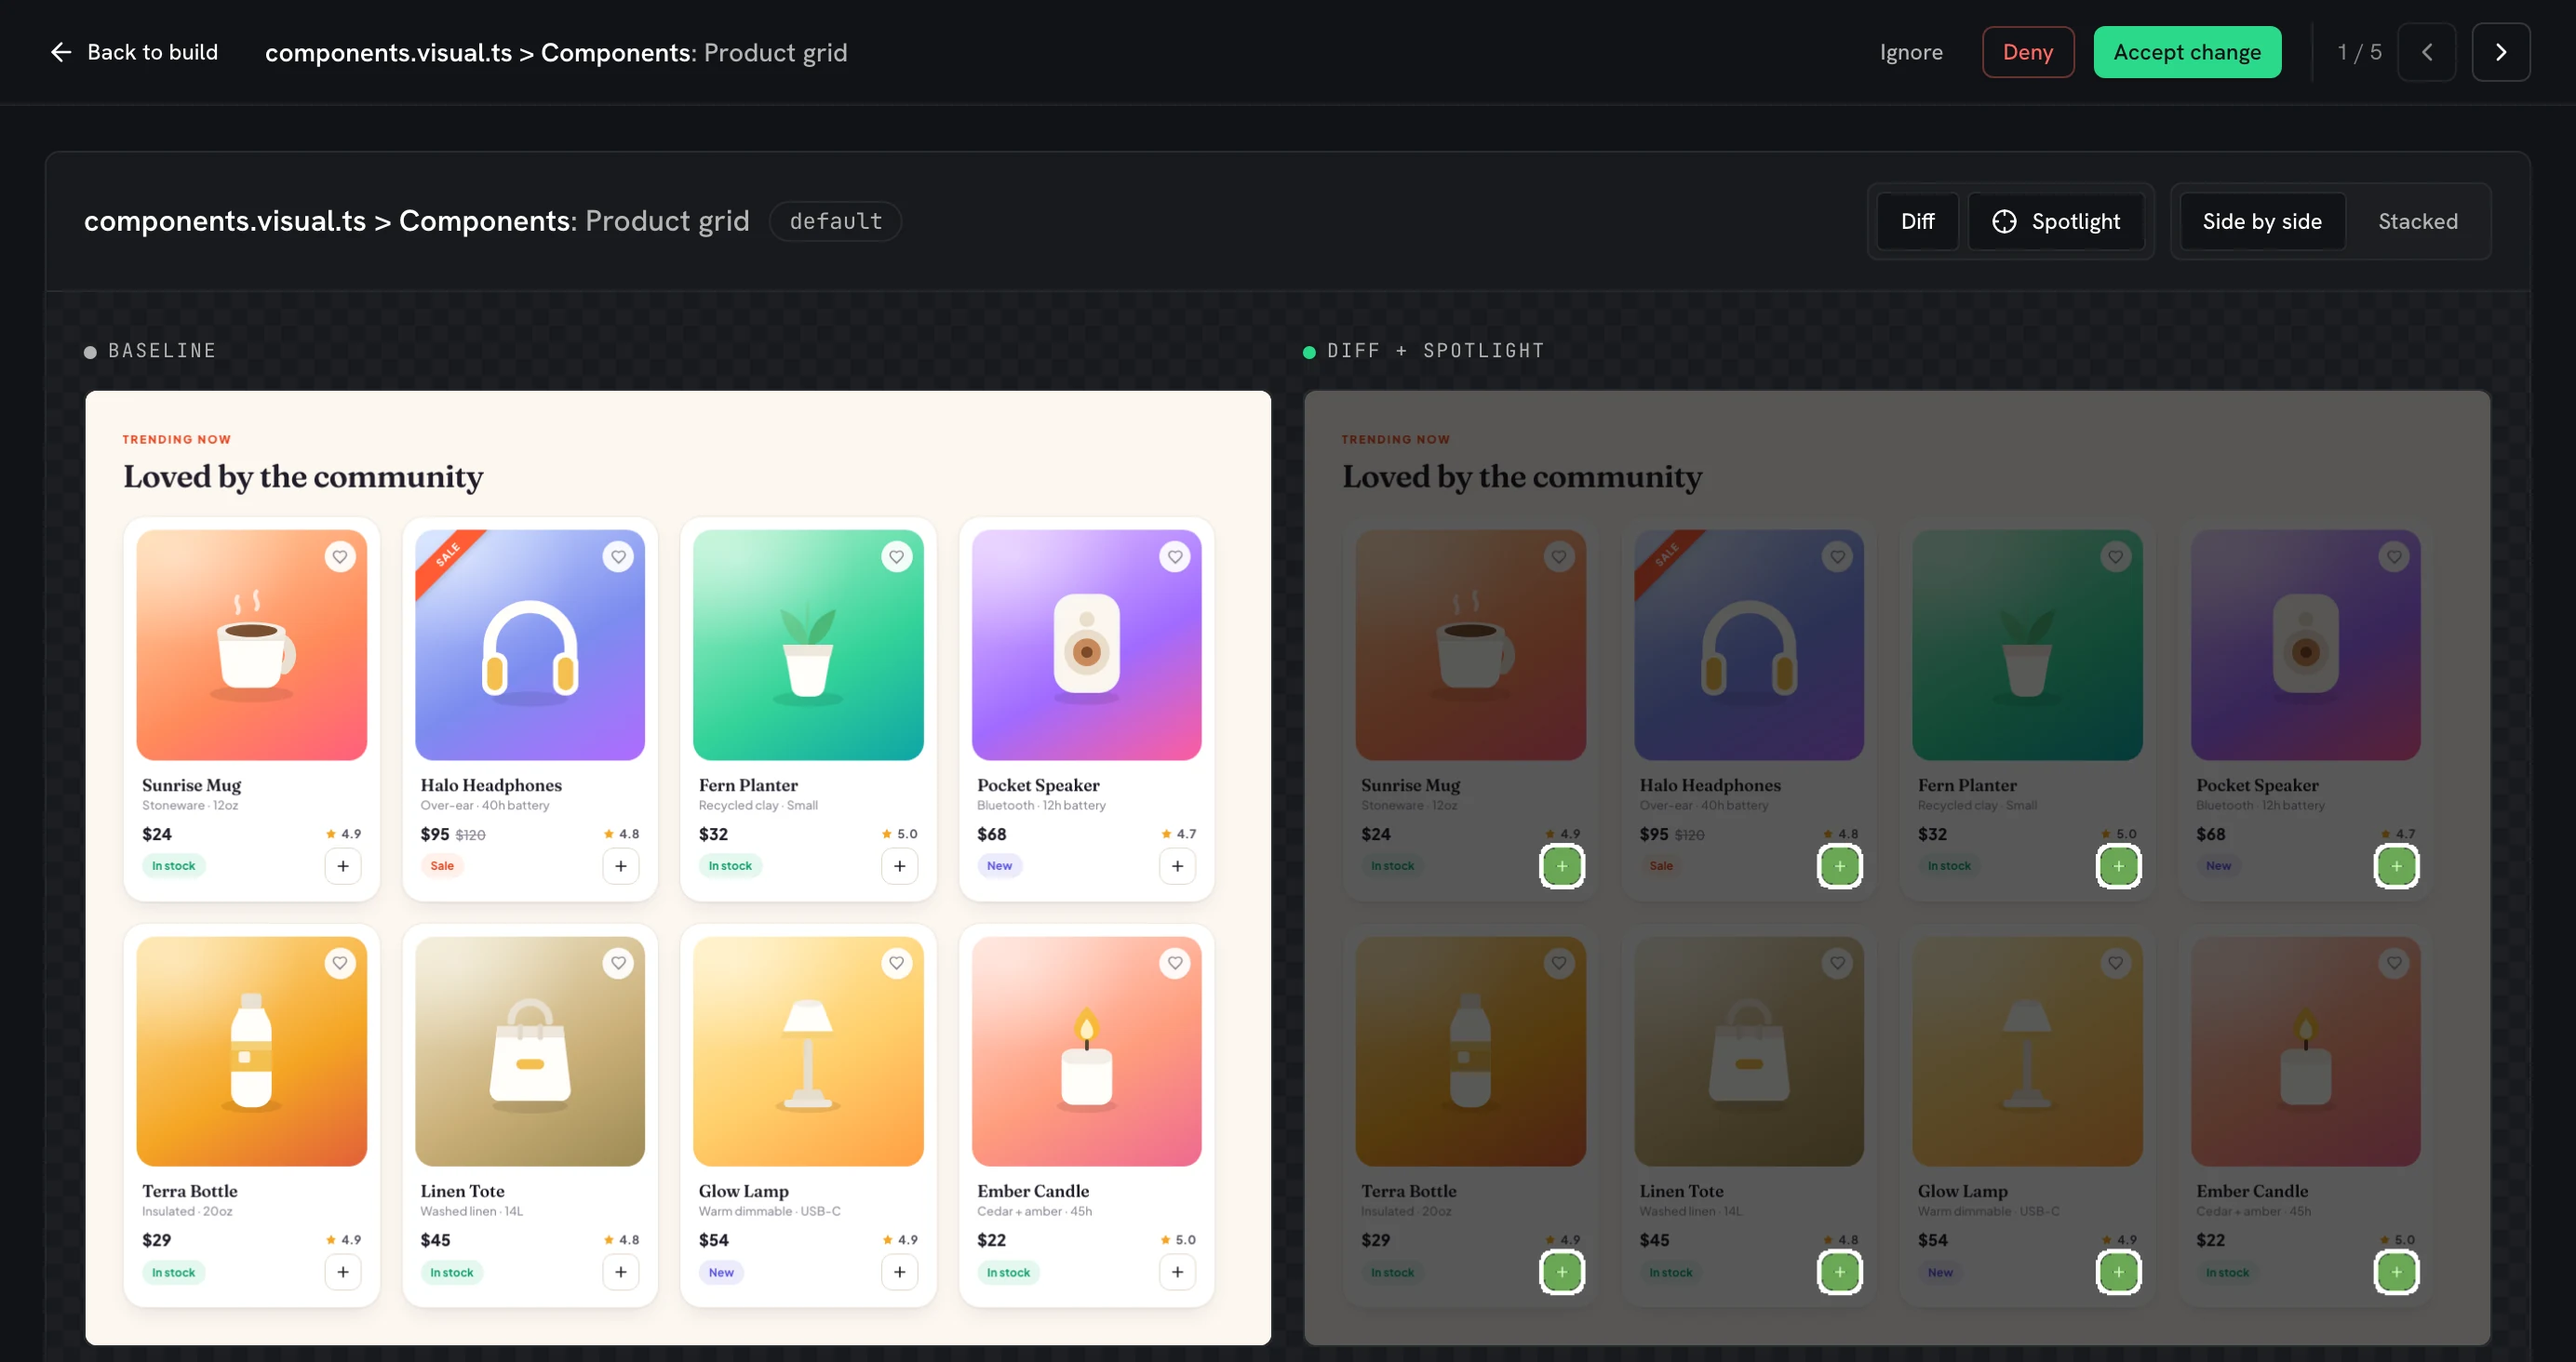
bun test visual test of a small demo storefront, archived with @uiverify/bun and reviewed in UI Verify. In this staged change the add-to-cart buttons were filled with dark ink, 0.82% of the capture's pixels changed, and Spotlight dims everything else so the eight changed buttons are the only thing lit. The same style change moved four other captures in that build, which is why the header reads 1 / 5.What is Bun visual regression testing?
Bun visual regression testing compares what a page or component looks like after a change against an approved baseline image, so a change to the pixels shows up as a diff you review. bun test checks behavior and never sees the UI; a visual test catches the padding, color, font or layout change that every assertion passes straight through.
Bun has no image assertion of its own: its snapshot matchers compare text. Bun does ship Bun.WebView, a built-in headless browser that can take screenshots, and @uiverify/bun builds on it so a visual test is an ordinary bun test file.
How do you set up visual testing in Bun?
You need Bun 1.3.12 or later and Google Chrome or Chromium on the machine that runs the tests. The uiverify CLI that uploads the archive runs on Node 24 or later. Setup takes a few minutes.
1. Install the SDK
bun add -d @uiverify/bun@0.1.02. Define a suite
A suite sets what every test starts from: the viewports it runs at, where the page clock starts, and the color scheme.
// tests/visual/fixtures.ts
import { DEFAULT_VIEWPORT, defineSuite } from "@uiverify/bun";

export const visualSuite = defineSuite({ viewports: { "": DEFAULT_VIEWPORT } });
3. Write a visual test
A test drives the page. One that never calls takeSnapshot() is captured once, when it ends. Name a snapshot to capture a state you choose.
// tests/visual/home.visual.ts
import { expect, takeSnapshot } from "@uiverify/bun";
import { visualSuite } from "./fixtures";

const { test } = visualSuite(import.meta.path);

test("menu", async (page) => {
  await page.goto("/");
  await page.getByRole("button", { name: "Menu" }).click();
  await expect(page.getByRole("menu")).toBeVisible();
  await takeSnapshot("open"); // optional; a test with no takeSnapshot() is archived at its end
});
4. Add the runner script
run() starts your app's web server, runs every *.visual.ts file in its own bun test process, and writes the archive to ./uiverify-archive. To capture components without running your app, serve a preview page with serveBundle(); the Bun quickstart shows it.
// tests/visual/run.ts
import { run } from "@uiverify/bun/run";

process.exitCode = await run({
  webServer: { command: ["bun", "server.ts"], port: 3000 }, // your app's start command; it gets PORT
});
5. Run the tests and upload the archive
Run the script, then upload ./uiverify-archive with your project API key. UI Verify replays each test, screenshots it and diffs it against the baseline.
bun tests/visual/run.ts   # writes ./uiverify-archive
UIVERIFY_API_KEY=your_key npx -y uiverify@1.8.0 upload --static-dir ./uiverify-archive
Run the same two commands in CI, on pull requests and on your default branch. Accept the first default-branch build once, or add --auto-accept-changes to that upload, and it becomes the baseline every pull request diffs against. Capture baselines in CI on Linux, not on your laptop, so every build renders text the same way. The full GitHub Actions workflow is in the Bun quickstart.
How does UI Verify compare to Playwright and hosted services on Bun?
Teams that visual-test a Bun project today mostly use Playwright's toHaveScreenshot(), because Bun's own test runner has no image assertion. They differ in where the test runs, where the screenshot is taken, and where baselines live.
| UI Verify | Playwright toHaveScreenshot() | |
|---|---|---|
| How it runs on Bun | On bun test, driving your installed Chrome through Bun.WebView. No Playwright or Node test runner to add | In Playwright's own test runner, which runs on Node. Its docs list npm, yarn and pnpm, and its maintainers say they do not test against Bun |
| Where the screenshot is taken | UI Verify's cloud, replaying an archive of each test in one pinned browser | The machine running the test, so each operating system gets its own baseline (-chromium-darwin) |
| Where baselines live | Hosted, one per branch, resolved from git | PNG files committed in a -snapshots folder next to the test |
| Updating a baseline | Accept in the dashboard or from your agent; merging advances it | Re-run with --update-snapshots and commit the new PNGs |
| Where you review a change | A check and a comment on the pull request, and the review queue | A failing test, with the diff images in Playwright's report |
| Skipping unchanged tests | Not for Bun yet: every test renders on every build | Every test that runs is screenshotted and diffed again |
| Review from a coding agent | MCP tools return each diff and accept or reject it | The agent reads the failing test and the files on disk |
| Intended change or regression | An AI judge labels each change and says why | A pixel threshold |
| Price | Free for 10,000 snapshots a month (50,000 for open source); paid plans include more, then per snapshot | Free, it runs in your CI |
Hosted services take a different route. Argos's CLI docs show installing it with bun add and running it with bun x argos, but it uploads screenshots your own tool already produced, so the capture still comes from something other than bun test. We found no Bun setup in the Chromatic or Applitools docs. For the full comparisons, see UI Verify vs Argos and UI Verify vs Chromatic.
Sources: Argos CLI docs, Chromatic Playwright docs, Applitools Playwright docs, checked 2026-11-02.
What does UI Verify add to Bun?
- Visual tests without a second test runner. Your tests stay
bun testfiles and capture with the Chrome you already have, so there is no Playwright to install and no browser to download. - Your coding agent checks its own UI work. While it edits, the agent runs the affected tests, uploads the archive with
uiverify check, and reads the diffs over MCP, so it sees what its change did to the UI before it opens a pull request. See Check visual changes mid-edit. - Every pull request is checked again. UI Verify posts a check and a comment with the diff on the pull request, and a change waits in the review queue until you, or your agent, accept or reject it.
- The same pixels on every machine. Every capture is replayed in one fixed environment, so your Mac and the Linux CI runner produce the same screenshot. Each test starts with the page clock set,
Math.randomseeded, animations finished and fonts and images loaded. You still keep live data in fixtures; the determinism checklist shows how. - No screenshots in your repo. Baselines are hosted, one per branch, resolved from git, and every version of a test is kept, so you can see how a page looked build over build. See baselines.
- Baselines advance when you merge. Nothing to regenerate on the right OS and nothing to commit.
- Flaky changes stay out of the way. A change that does not reproduce on a re-render is marked flaky instead of turning the pull request red. See automatic flake detection.
- An AI judge on each change. Each change is labeled an intended change or a likely regression, with the reason. See the AI judge.
When is Playwright the better choice for a Bun project?
Playwright's toHaveScreenshot() is the right tool for a small suite that only ever runs on one machine, or inside one Docker image everyone renders through. It is free, it needs no service, and it can screenshot Firefox and WebKit as well as Chromium, where a UI Verify Bun capture is replayed in one pinned browser.
It also skips nothing, and neither does UI Verify on Bun yet: every test renders on every build, because @uiverify/bun does not write the dependency graph UI Verify needs to skip unchanged tests. If you want that today, Playwright and Vitest projects have it. UI Verify on Bun fits when you want your coding agent to review its own UI changes, an AI judge on the pull request, and baselines that do not depend on which machine took them.
Frequently asked questions
Do I need Playwright for Bun visual testing?
No. @uiverify/bun runs your visual tests on bun test and drives the Chrome you have installed through Bun.WebView, so there is no Playwright and no Node test runner to add. The uiverify CLI that uploads the archive runs on Node 24 or later.
Which Bun version does UI Verify need?
Bun 1.3.12 or later, the release that added Bun.WebView, plus Google Chrome or Chromium on the machine that runs the tests. Set BUN_CHROME_PATH to use another Chrome. Bun marks Bun.WebView experimental, so its API can change between Bun releases.
Can I test components without running my whole app?
Yes. Serve a preview page with serveBundle(), point the suite at it, and each test captures the components that page mounts. With only component tests, drop webServer from the runner script. The Bun quickstart has the example.
Does UI Verify skip unchanged tests on Bun?
Not yet. Every Bun test renders on every build, because @uiverify/bun does not write the dependency graph that skip unchanged needs. Playwright and Vitest projects get it by default.
Why capture baselines in CI instead of on my Mac?
A baseline captured on a Mac renders text differently from a Linux one, so a Mac-captured build diffs against a Linux build. Capture in CI on Linux, as the quickstart's workflow does, and every build compares like with like.
Why do Bun visual tests flake?
Usually live data, a clock the test did not fix, or an animation that never stops, such as a requestAnimationFrame loop. UI Verify already pins the clock, randomness, motion and fonts; live data belongs in fixtures served with page.route(). The Deterministic Bun captures skill is the checklist.
How much does Bun visual testing with UI Verify cost?
It is free for 10,000 snapshots a month, and 50,000 a month for open-source projects. A snapshot is one capture (a test's end-of-test capture, or each takeSnapshot() call) in one browser at one viewport. See snapshot billing.
Can my coding agent set it up?
Yes. The Set up visual testing skill wires the SDK and CI, and Deterministic Bun captures is the determinism checklist it applies. The Bun quickstart also opens with a prompt you can paste into your agent.
Guides and posts
Visual-test your Bun project today
Install one SDK, upload once, and your next pull request is checked. Free for 10,000 snapshots a month, 50,000 for open source.