How to implement a Figma design with a coding agent
Implement a Figma design with a coding agent and check it matches: set the export as the story's baseline, read the diff, fix top down, then accept.
 Igor LuchenkovBuilding UI Verify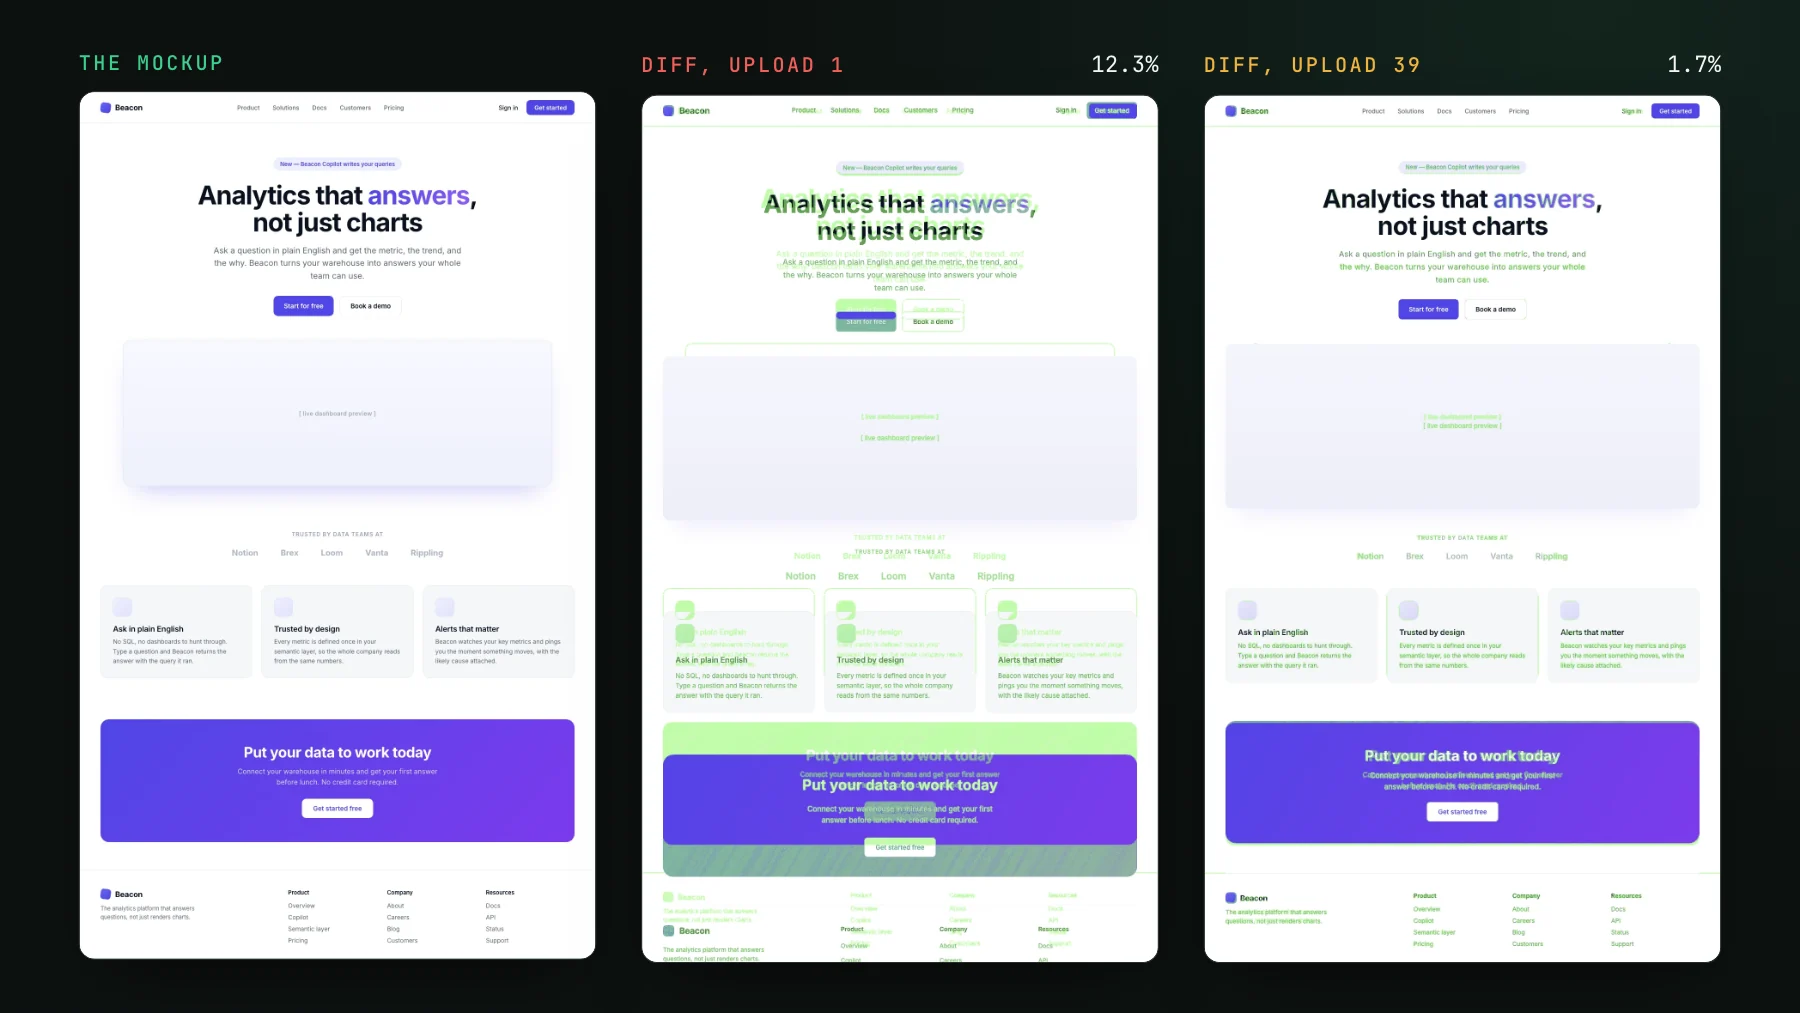
On this page
- What does a coding agent need to implement a Figma design?
- Step 1: export the frame at the width you build
- Step 2: declare the design on the story
- Step 3: bring the fonts, and ignore only what moves
- Step 4: upload, read the diff, and fix from the top down
- How do you know when the page matches the design?
- Why not accept the render as soon as it looks close?
- Run the loop with the skill
I gave a coding agent a landing-page mockup and one job: make the Storybook story match it. The first render looked right when I put the two side by side. The diff against the mockup said 12.3% of the page's pixels were off, and the page was 67px taller than the design. Thirty-nine uploads later the number was 1.7%, and the page still was not done. This post is the loop that got it there, what each step is for, and what the number does and does not tell you.
What does a coding agent need to implement a Figma design?
A coding agent needs a way to see how far its render is from the design. Reading the Figma frame gets it a close first draft: the right sections, the right copy, roughly the right sizes. What it lacks is feedback. It cannot tell that the heading is two sizes too big or that a card sits 20px low, so it declares the page done and the last mile lands on whoever reviews it. The fix is to make the design the thing every render is compared against.
In UI Verify that is a design baseline: a design image declared as a story's baseline, so each upload of that story is diffed against the design instead of against an earlier screenshot of itself. The diff is the same one that catches regressions. The only change is what sits on the other side of it. You can see the whole flow on the Figma to code page; the rest of this post is the detail.
Step 1: export the frame at the width you build
Export the Figma frame as a PNG at 1x. A frame drawn at 1200px should come out 1200px wide, not 2400. If your agent has the Figma MCP connected it can export the frame itself from a link; otherwise select the frame, pick PNG and 1x in the export panel, and commit the file. UI Verify scales the design to your render's width before comparing, so a small mismatch in width will not break the diff, but building at the canvas width the designer used keeps every measurement meaningful.
Step 2: declare the design on the story
export const Landing: Story = {
  parameters: {
    uiVerify: {
      baselineImage: "design/beacon.png",
    },
  },
};
The value is a path to a PNG that ships inside your built Storybook (put it in a staticDirs folder) or a data: URI. Remote URLs are not accepted: the design has to travel with the upload, so nothing depends on a Figma link staying alive. The story carries its own design, which means no story IDs to look up and no separate upload step. Today this works for Storybook projects.
Step 3: bring the fonts, and ignore only what moves
Ship the design's font files with Storybook. Without the exact font, every line of text is a few pixels off and the diff lights up on copy you never touched, which buries the differences that matter.
Then mark anything that is supposed to differ with data-uiverify-ignore: a background video, an autoplay animation, live or random data. UI Verify blanks that element's box on both the design and your render, so it never counts. Use it sparingly. The whole box is blanked, so the box's own size and position go unchecked too, and a missing product photo is an unfinished page, not a dynamic region. Placeholder copy in the mockup is the other common trap: if production shows real data there, either ignore it or put the mockup's text in the story's fixtures.
Step 4: upload, read the diff, and fix from the top down
Build Storybook and upload it with uiverify upload. The first build comes back changed, often by a lot. The useful part is not the percentage but where the green is. Over the UI Verify MCP your agent can pull the design and its render side by side, cropped to each region that differs, and page through a tall page in 500px bands so the footer gets the same attention as the hero. UI Verify shows where the pixels differ; the agent looks at those crops and works out why, whether that is a size, a gap, a weight, or a wrap.
That picture is why the order matters. A vertical difference near the top, a few pixels of padding or a heading one step too large, pushes everything below it down, and the diff then reports every section underneath as wrong. Fix the page from the top: get the first section to match, move to the next, and after any change to a height or a gap, look again at everything below it. Fixing the footer first is wasted work until the sections above it stop moving.
How do you know when the page matches the design?
You know it matches when every remaining difference is a thin anti-aliased edge, not when the percentage gets small. Re-rendering each of that agent's 39 commits against the mockup gives the curve below. The first ten uploads were mostly vertical work; the page only reached the mockup's height at upload 11. After that the gains came one section at a time, and one change at upload 15 reopened a section above it.
The flat tail is where it is tempting to stop, and 1.7% sounds close to done. It was not. The percentage counts pixels, so a large blank area and an ignored box both dilute it, and a real layout difference can be a very small number. At upload 39 the call to action still wrapped on a different word, and the ignored preview box was 104px wider than designed. Neither moved the number much.
Why not accept the render as soon as it looks close?
Accepting ends the comparison with the design. When you accept a render, it becomes the story's baseline, and from then on every pull request is checked against that render, not against the mockup. That is what you want once the page is right: the design did its job and the regression check takes over. Accept too early and whatever was still off becomes the reference, and every later build passes against it.
Until you accept, a story that does not match its design shows as changed, like any other visual change, so it cannot slip through a pull request unnoticed. When the designer ships a new export of the same frame, the new image takes over as the baseline again and the page is checked against the new design. The design baseline is also scoped to your branch, so declaring one on a feature branch does not move the baseline on main.
Run the loop with the skill
The steps above are a procedure, so they are packaged as an agent skill. Install it with npx skills add uiverify/uiverify --skill implement-figma-design, then hand your agent the Figma link and run /implement-figma-design. It exports the frame, declares it on the story, and works down the page one section per upload, reading UI Verify's crops rather than screenshots of its own page. It stops before accepting, so the decision that the page matches stays yours. The skill page has the full playbook.
Matching the design is the authoring half of the job. Once the page is accepted, keeping it that way is ordinary visual regression testing: every later pull request is diffed against the render you approved, and baselines covers how that render moves across branches.
Build your next page to the design
Set a Figma export as a story's baseline and let your agent close the gap. Free to start, no credit card.
Start for freeNo credit card required.
Implement a Figma design
Build a page from its Figma design and converge the render until it matches.